
“Check” and “checkmate” are two of the most common terms in chess. These two terms are of great importance to understand for any chess player.
Check
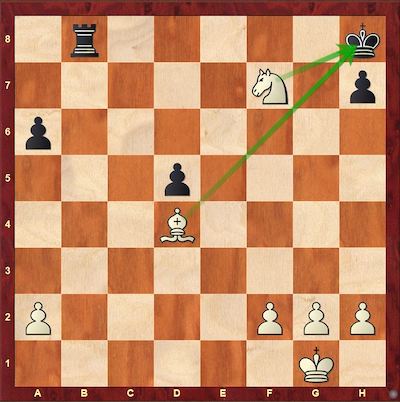
An attack on the king is termed a “check”. For example, diagram -1 shows the Black queen checking the White king, whereas, in diagram-2, we see the White knight and bishop checking the Black king simultaneously (Two “checks” at the same time is called a double check).
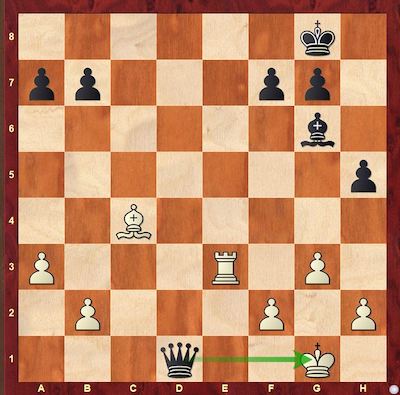
Note: The two kings cannot reside on adjacent squares according to the rules of chess as this will result in a mutual check.
Now that the concept of “check” is clear to you, let me draw your attention to a very important rule in chess that “the king cannot be captured”. Naturally, this demands we find ways to escape a check.
Escaping a Check
There are three ways to escape a check:
- Capture the piece that is checking.
- Block the check with a piece.
- Move the king to a square not controlled by any of the enemy pieces. These safe squares are called flight square or escape square.
Note: Knight checks and pawn checks cannot be blocked.
Let’s understand this with the help of a few examples.
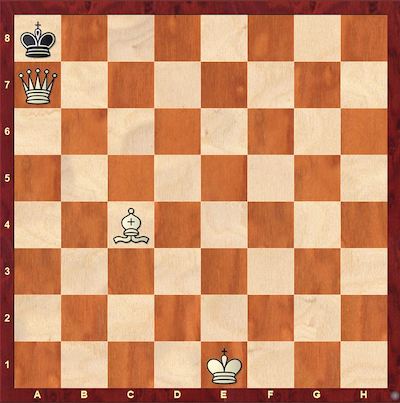
In diagram-3, we can see the White queen checking the Black king. Let’s look at each of the ways to escape the check and find out which of them are possible in the position.
- The king can capture the queen, thereby eliminating the checking piece.
- The “check” cannot be blocked for two reasons:
A) There are no other Black pieces on the board.
B)There are no squares in between the Black king and the White queen where a Black piece can be moved to, blocking the check. - The king cannot be moved to any square as all the squares available for the Black king (b8, b7) are controlled by the White queen.
Hence, we can conclude that in the given position, the only way to escape the check is by capturing the queen.
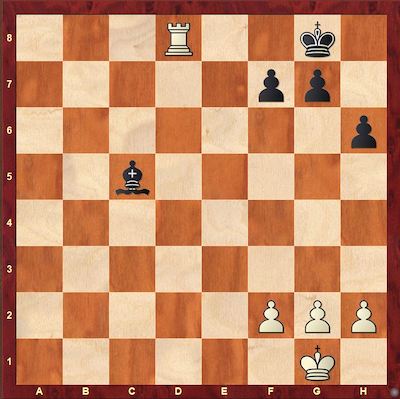
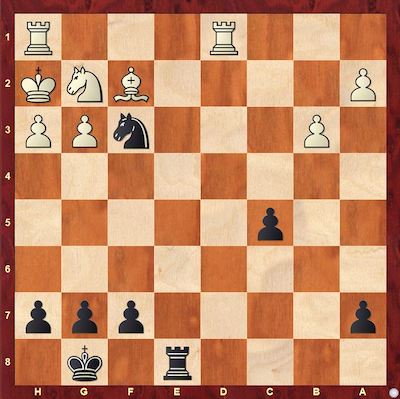
Consider diagram-4, where the White rook is checking the Black king. Let’s evaluate the escaping possibilities in this position:
- There are no Black pieces that can capture White’s rook.
- The check can be blocked by moving the Black bishop to f8.
- Black’s king can move to the square h7.
Thus, in the given position, Black can either block the check with the bishop or move the king to h7.
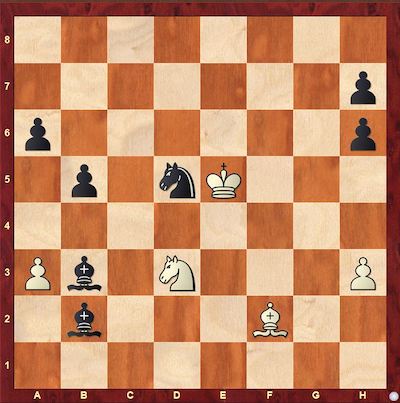
Consider the final example (diagram-5) where Black’s dark-squared bishop is checking White’s king. Again, let’s look at the escaping possibilities:
- Black’s dark-squared bishop can be captured by White’s knight, thereby eliminating the checking piece.
- White’s bishop can block the check by moving to d4.
- White’s king can move to squares d6, e6, f5, or e4. However, the king can’t move to f6 or d4 as Black’s dark-squared bishop controls them. Similarly, the king can’t move to f4 as it is controlled by Black’s knight (the knight also controls f6). Also, capturing the knight on d5 with the king is not an option as Black’s light-squared bishop is supporting it (controlling the d5 square).
Hence, in the given position, White can apply any of the three ways mentioned above to escape the check.
Now that we’ve understood the concept of check and found ways to escape a check, the most obvious question is, “What if there is no way to escape a check?” The answer to this is our next topic of discussion: checkmate!
Checkmate
A checkmate (or simply ‘mate’) is a position where the side under check has no way of escaping the “check”. This leads to a situation where the king is ‘trapped’, which grants the ‘checking side’ the victory.
As always, let’s look at a few examples.
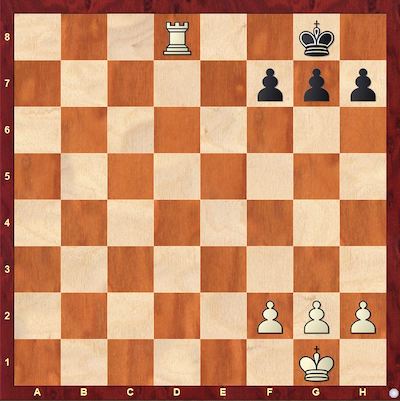
Diagram-6 shows White’s rook checking Black’s king. Let’s consider each of the ways for escaping the check:
- There are no Black pieces that can capture the White rook.
- There are no Black pieces to block the check.
- Black’s king doesn’t have any square to move to (the 7th rank being occupied by Black’s pawns and squares f8 and h8 being controlled by White’s rook).
Thus, the given position is an example of a checkmate.
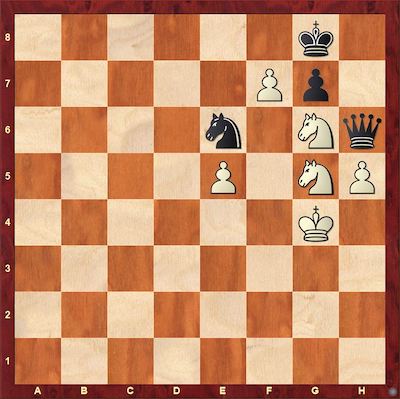
Consider diagram-7 where Black’s knight is checking White’s king.
- No White piece can capture Black’s knight.
- Knight checks cannot be blocked (refer to the note on ‘Escaping a check’).
- The only escape square for White’s king (g1) is controlled by Black’s knight.
Thus, this position is also a checkmate.
Now, let’s consider the final example. Diagram-8 shows a position where White’s pawn on f7 is checking Black’s king.
- White’s pawn on f7 cannot be captured by any of Black’s pieces (Black’s king cannot capture the pawn as White’s knight supports it on g5).
- Pawn checks cannot be blocked (refer to the note on ‘Escaping a check’).
- Black’s king’s escape squares f8 and h8 are controlled by White’s knight on g6, whereas the knight on g5 controls h7.
Hence, we can say that the Black king is checkmated (which means that White won the game).
Conclusion
Checkmating the opponent’s king is the only way to win the game. Similarly, escaping “check” helps the player to avoid losing a game. Therefore, it is essential to have an excellent grasp of these to become a good chess player.
To learn more about chess moves and strategies, attend our online classes by signing up here.